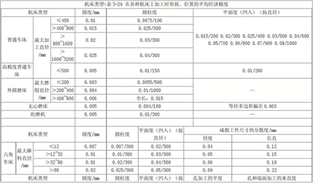
As the industry develops faster and faster, machine tool processing is becoming more and more important in industrial production. As an important tool for machine tool processing, machine tools have gradually evolved into common types of machine tools such as lathes, milling machines, planers, boring machines, drilling machines, and grinding machines. When it comes to the machine tool processing technology of various processes, the processing accuracy has to be mentioned. This is used to describe the fineness of product production, and is usually used to describe the geometric parameters of the processed surface. In short, the machining accuracy is negatively correlated with the tolerance level. That is, the machining accuracy is expressed by the tolerance grade, and the smaller the grade value, the higher the machining accuracy of the machine tool. Conversely, the higher the tolerance grade value, the lower the machining accuracy.
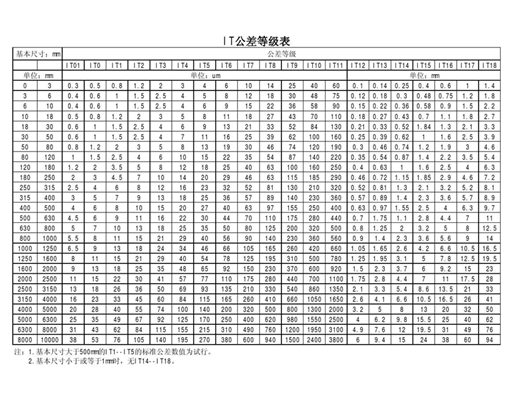
"Tolerance grade" is explained in Baidu Encyclopedia as "the grade to determine the degree of dimensional accuracy. The national standard is divided into 20 grades, from IT01, IT0, IT1 to IT18. The larger the value, the lower the processing accuracy, and the range of allowable size changes The larger the (tolerance value), the smaller the processing difficulty. According to the above, IT01 indicates that the machining accuracy of the part is the highest, and IT18 indicates that the machining accuracy level of the part is the lowest. Generally speaking, factory and mining machinery belongs to IT7 level , agricultural machinery belongs to IT8.
According to the different functions of the product parts, the required processing accuracy is also different, and the processing technology selected by the engineer will not be the same. This extremely tests the processing strength of the CNC machine tool processing factory and the professional experience of the engineers.

(IT tolerance grade table)
1- Lathe processing. Generally, the turning process is carried out, that is, the cutting process in which the turning tool moves in a straight line or a curve in the plane. Turning generally processes the internal and external cylindrical surfaces, end surfaces, conical surfaces, forming surfaces and threads of the workpiece and reverses them. The turning precision is generally IT8-IT7, and the surface roughness is generally 1.6μ~1.8μ.
The editor reminds you that even lathe machine tool processing can be divided into several categories such as rough turning, semi-finishing turning and finishing turning, and high-precision turning.
in:
A- Rough turning. Pay attention to the use of larger cutting depth & large feed rate under the condition of not reducing the cutting speed to achieve the goal of improving turning efficiency. However, the machining accuracy of rough turning can only reach IT11, and the surface roughness is Ra20, which is about 10 μm.
B-Semi-finishing and finishing turning. This kind of processing technology uses high speed and small feed rate and cutting depth as much as possible. The processing accuracy can generally reach IT10-IT17, and the surface roughness is generally Ra10, that is, 0.16μm
C- high precision lathe processing. Generally, high-hardness diamond turning tools are used to process non-ferrous metal parts. The machining accuracy can reach about IT7-, IT5, and the surface roughness is generally Ra0.04 or 0.01μm. This lathe turning process is called "mirror turning"
2- Milling process. Milling refers to the use of rotating multi-edged tools to cut workpieces and is a very efficient processing method. Generally suitable for machining planes, grooves, various forming surfaces (such as splines, gears and threads), etc. According to the same or opposite of the main movement speed and the feed direction of the workpiece during milling, milling can be divided into down milling and up milling.
Milling can be performed on horizontal milling machines, vertical milling machines, gantry milling machines, tool milling machines and various special milling machines. For small and medium-sized parts produced in small batches, horizontal milling machines and vertical milling machines are the most commonly used.
The machining accuracy of milling is generally IT8-IT7, and the surface roughness is generally Ra6.3, which is about 1.6μ
in:
A- The machining accuracy during rough milling is IT11-IT13, and the surface roughness is Ra5, which is 20μm;
B- The machining accuracy during semi-finish milling is IT8-IT11, and the surface roughness is Ra2.5, which is 10μm;
The machining accuracy of C-fine milling is IT16-IT18, and the surface roughness is Ra0.63, which is about 5μm.
3- Planing processing. This is a cutting process in which the workpiece is reciprocated horizontally and linearly with a planer, and it is mainly used in the shape processing of parts. Planing machine tools are commonly used planer, gantry planer and so on. Planing can be done on planers and planers. Small and medium-sized parts produced in small batches of one piece are usually carried out on a shaping machine.
The planing precision can generally reach IT9-IT7, and the surface roughness is Ra6.3, that is, 1.6μm.
A- The machining accuracy of rough planing can reach IT12-IT11, and the surface roughness is 25, that is, 12.5μm.
B-Semi-finishing planing accuracy can reach IT10-IT9, and the surface roughness is 6.2, that is, 3.2μm.
C-finishing precision planing can reach IT8—IT7, and the surface roughness is 3.2, that is, 1.6μm.
4- Grinding process. Grinding is a processing method that uses abrasives and abrasive tools to remove excess material on a workpiece. It belongs to finishing and is widely used in the machinery manufacturing industry. Grinding is usually used for semi-finishing and finishing, the precision can reach IT8-IT5 or even higher, and the surface roughness of grinding is Ra1.25, which is 0.16μm;
A- The surface roughness of precision grinding is 0.16—0.04μm.
B-Ultra-precision grinding surface roughness is 0.04—0.01μm.
The surface roughness of C-mirror grinding can reach below 0.01μm.
5- Drilling process. This is a basic method of hole machining. Drilling is usually performed on a drill press, lathe, boring machine or milling machine.
The machining accuracy of drilling is generally low, usually only up to IT10, and the surface roughness is Ra12.5, which is 6.3 μm. After drilling, operations such as reaming and reaming are usually used to assist in the completion of semi-finishing , Finishing operations.
6- Boring processing. This is an internal diameter cutting process that uses a tool for reaming or other circular contours. It is usually used from semi-roughing to finishing. The tool used is usually a single-edged boring tool or boring bar.
A - The boring accuracy of iron and steel materials can generally reach IT9-IT7, and the surface roughness is 2.5-0.16μm.
B- The machining accuracy of precision boring can reach IT7-IT6, and the surface roughness is 0.63-0.08μm.

Do you also want to know the highest precision values that can be achieved by other machine tool machining processes? You can contact the editor, and the editor will introduce the relevant information to you in detail!